

 The
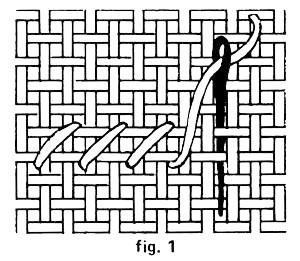
magic number for cross stitching on linen is two. The basic stitch
on linen is done from left to right, bottom to top, like handwriting,
slanting over two threads and up two threads (fig. 1).
Count the threads of the linen, not the spaces. Think of a ladder and
count rungs, not holes.
The
magic number for cross stitching on linen is two. The basic stitch
on linen is done from left to right, bottom to top, like handwriting,
slanting over two threads and up two threads (fig. 1).
Count the threads of the linen, not the spaces. Think of a ladder and
count rungs, not holes.
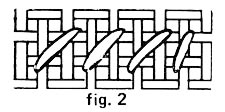 This
will only be necessary for about three stitches. After that, the eye will
begin to see in twos. Should a mistake occur, it will be immediately apparent
by the slant (fig. 2). All understitches are made first,
all in one direction. Do the understitches of one color area across the
row from left to right, then cross back from right to left even for a
This
will only be necessary for about three stitches. After that, the eye will
begin to see in twos. Should a mistake occur, it will be immediately apparent
by the slant (fig. 2). All understitches are made first,
all in one direction. Do the understitches of one color area across the
row from left to right, then cross back from right to left even for a 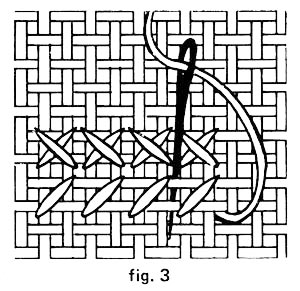 row
of two stitches (fig. 3). The reverse side of the work
should show small vertical stitches (fig. 4).
row
of two stitches (fig. 3). The reverse side of the work
should show small vertical stitches (fig. 4). 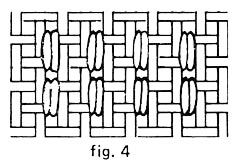 Never
cross each stitch of a horizontal row individually, as that technique
wastes thread and pads the back. For a row of vertical stitches one stitch
wide, however, each stitch is crossed individually (figs.
5a and 5b).
Never
cross each stitch of a horizontal row individually, as that technique
wastes thread and pads the back. For a row of vertical stitches one stitch
wide, however, each stitch is crossed individually (figs.
5a and 5b).
HOOPLESS STITCHING: Cross
stitch on linen does not require an embroidery hoop. Instead, the hand
is 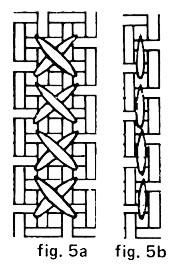 held
in a relaxed position with the thumb and forefinger grasping the cloth
and the little finger anchoring it. On a tiny piece of fabric, it may
be necessary to anchor with the ring finger. However, do not sew with
the fabric wrapped over only one finger as this may distort the stitches.
held
in a relaxed position with the thumb and forefinger grasping the cloth
and the little finger anchoring it. On a tiny piece of fabric, it may
be necessary to anchor with the ring finger. However, do not sew with
the fabric wrapped over only one finger as this may distort the stitches.
SEWING MOTION, NOT STAB STITCH: A sewing stitch, one scooping movement in and out, is used with linen. Stitches should be neither loose and sloppy nor so tight that the space between the linen threads are enlarged. If light can be seen across the top of a row of stitches, the tension is too tight. Correct tension results in flat stitches that do not distort the background weave.